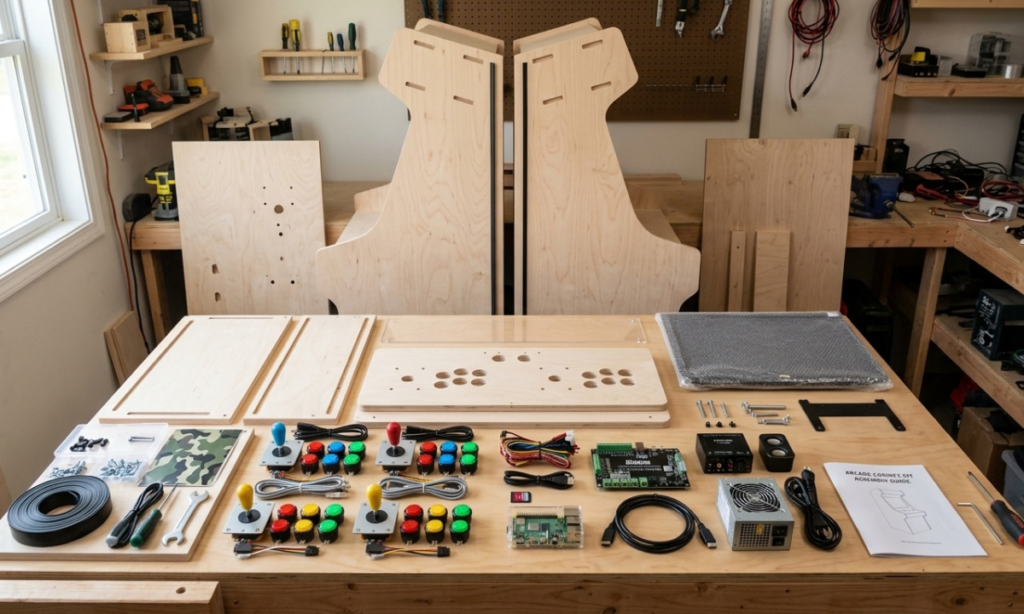

An Arcade Cabinet Kit can give gaming fans a practical starting point for building an arcade machine at home. Instead of designing every cabinet panel from scratch, a kit can provide pre-cut pieces and, depending on the product, controls, mounting hardware, or electronic components.
The exact contents vary, so checking the product specification is important. Documented arcade projects show that a complete setup can combine a cabinet, display, joystick, buttons, speakers, wiring, controller hardware, storage, and a small computer.
What Is an Arcade Cabinet Kit?
An it is a collection of parts designed to help you build an arcade-style gaming machine. Some kits mainly provide pre-cut cabinet panels, while more complete packages can include joysticks, buttons, speakers, wiring, display components, or other hardware.
For example, Adafruit’s Cupcade project lists an acrylic case, display, joystick, buttons, speaker, wiring, Arcade Bonnet, and other components as part of its kit. Because kits differ considerably, it is better to think of an it as a starting platform rather than assuming every kit contains the same parts.
Who Is an Arcade Cabinet Kit For?
An it can be useful for people who want a home arcade while also enjoying the building process. It can suit retro-gaming fans, DIY hobbyists, makers, and beginners who prefer working from an established cabinet design. The difficulty depends on the kit. Some projects require drilling, wiring, soldering, Linux configuration, or other technical skills. Adafruit’s Cupcade documentation, for example, describes a build involving Linux commands, soldering, and maker skills.
What Are the Main Features of an Arcade Cabinet Kit?
Cabinet Design and Build Quality
The cabinet is the main physical structure that holds the display, controls, speakers, and internal electronics. DIY arcade projects commonly use materials such as MDF, plywood, or acrylic. A recent bartop design uses MDF panels, while Microsoft’s MakeCode Arcade cabinet project uses plywood.
Arcade Controls and Joysticks
Controls determine how players interact with the machine. A typical arcade control panel can contain a joystick, action buttons, start buttons, and additional controls depending on the design. Controller boards can simplify wiring by providing connections for arcade buttons and joysticks.
Adafruit’s Arcade Bonnet is specifically designed for this type of arcade control setup. Before buying, check the number of players supported and whether the control layout matches the games you intend to play.
Display and Audio Components
The display provides the visual part of the arcade experience, while speakers provide game audio. These components may be included with some kits but sold separately with others. Documented projects use different display sizes depending on cabinet dimensions. A compact arcade project, for example, uses a 7-inch LCD together with arcade controls and speakers.
Gaming Hardware and Software
An arcade cabinet can use different computing platforms. Raspberry Pi boards are commonly used in DIY retro-gaming projects, although other computers and dedicated systems can also be used. Raspberry Pi’s official documentation explains that different models have different power requirements and that the recommended power supply varies by model. Software also matters because available games and features depend on the hardware and software configuration. Always use games and software that you are legally entitled to use.
Customization Options
Customization is one of the appealing parts of an it. Depending on the design, you may be able to change artwork, buttons, joysticks, speakers, lighting, display hardware, or the computer. A published DIY bartop design describes customization involving monitors, arcade controls, speakers, lighting, artwork, and different hardware configurations.
What Are the Benefits of Using an Arcade Cabinet Kit?
Build a Personalized Arcade Setup
A kit provides a foundation for choosing compatible controls, display hardware, computer components, and artwork. This approach lets builders create a machine around their own space and gaming preferences rather than accepting a completely fixed configuration.
Enjoy Classic and Modern Games
A suitable arcade cabinet can be configured for different gaming platforms. Raspberry Pi-based projects are frequently used for retro-gaming builds, with arcade controls connected through compatible controller hardware. The games available depend on the installed system and software, so an it should not automatically be assumed to include a particular game library.
Save Time Compared With Building From Scratch
Pre-cut cabinet panels and established designs can reduce some planning and construction work. You may not need to design every angle, measurement, and mounting point yourself. However, a kit does not necessarily mean instant assembly. Depending on the design, you may still need to drill, wire, configure software, or install components.
Customize the Look and Controls
You can often personalize an arcade cabinet through artwork, control layouts, button styles, joysticks, speakers, or lighting. The available options depend on the cabinet and the compatibility of replacement components. Planning the control layout before assembly can help prevent unnecessary modifications.
Create a Fun Home Entertainment Space
An arcade cabinet can become a dedicated gaming feature in a suitable room or gaming area. The cabinet size should match the available space. A full-size design needs more floor space, while a bartop or compact it can be placed on a sturdy desk or counter.
What Types of Arcade Cabinet Kits Are Available?
Full-size cabinets are designed to provide a traditional upright arcade experience. They generally offer more room for larger displays, controls, speakers, and internal hardware. Their main consideration is physical space. Measure the room and access area before choosing a large cabinet.
Bartop Arcade Cabinet Kits
Bartop cabinets are designed to sit on a table, counter, or similar surface. They provide an arcade-style control panel while taking up less floor space. A 2026 Raspberry Pi bartop build describes a countertop-sized cabinet containing a monitor, two-player controls, speakers, and Raspberry Pi hardware.
Countertop and Compact Kits
Compact kits are designed for smaller spaces. Documented mini arcade projects have used small displays, compact controls, speakers, and small computers. These designs can be useful when a full-size cabinet is not suitable.
DIY Custom Arcade Kits
DIY custom kits provide a starting structure that can be modified according to the builder’s preferences. They can appeal to people who want more control over hardware, appearance, and layout. The trade-off is that additional customization can require more planning and compatibility checks.
How to Set Up an Arcade Cabinet Kit?
Prepare Your Workspace
Choose a clean, stable workspace with enough room for cabinet panels, electronics, and tools. Read the instructions before starting and organize the parts. If drilling or cutting is required, follow appropriate tool-safety procedures. Microsoft’s MakeCode Arcade cabinet documentation warns that power tools are required for its wooden cabinet project and recommends following safety procedures or asking a professional for help.
Assemble the Cabinet
Follow the recommended assembly order. Depending on the design, you may need to connect side panels, top and bottom sections, the back, display support, bezel, and control panel. Careful alignment is important because poorly positioned panels can make later installation more difficult. Some DIY designs use templates and specific assembly sequences to keep cabinet parts aligned.
Install the Controls and Display
Install the joystick and buttons according to the mounting instructions. Secure the display so it sits correctly inside the cabinet opening. Adafruit’s documented cabinet assembly shows separate installation of buttons, joystick, display, and speaker components.
Connect the Gaming Hardware
Connect the computer, controller board, controls, display, speakers, storage, and power components according to their documentation. For Raspberry Pi projects, use a power supply suitable for the exact model. Raspberry Pi’s official documentation lists different recommended supplies for different models. Never guess at electrical connections when manufacturer instructions are available.
Test the System
Test the display, buttons, joystick, audio, computer, and software before completely closing the cabinet. Input configuration may also be necessary. Adafruit’s Cupcade documentation includes configuring joystick directions and button assignments before using the controls for games.
How to Choose the Right Arcade Cabinet Kit?
Consider Your Available Space
Measure the intended location before ordering. Check height, width, depth, player position, and access around the machine. A bartop or compact it can be practical when floor space is limited, while a full-size design needs considerably more room.
Check Hardware Compatibility
Make sure the display, computer, controls, speakers, controller board, and power components are compatible. Check mounting dimensions, connectors, operating-system requirements, and power specifications before buying additional hardware.
Compare Build Materials
Consider whether the cabinet uses MDF, plywood, acrylic, or another material. Different materials can require different assembly methods. MakeCode’s documented cabinet, for example, uses half-inch plywood, while other DIY designs use MDF or acrylic.
Review Control and Display Options
Consider whether you need one-player or two-player controls and how many buttons your preferred games require. The display should fit the cabinet opening and support the connection used by your computer or gaming hardware.
Consider Your Budget
The kit price is only one part of the total cost. Additional expenses may include a computer, monitor, controls, speakers, power supply, storage, cables, and tools. Creating a complete parts list makes it easier to understand the actual project cost.
What Should You Consider Before Buying?
Assembly Difficulty
Read the assembly requirements carefully. Some kits are relatively simple, while others require woodworking, wiring, soldering, or software configuration. Choose a project that matches your available tools and experience.
Included Components
Check exactly what comes in the package. A cabinet-only kit is very different from a package containing controls, display hardware, speakers, wiring, and computer components. Do not calculate the final cost until you know which parts you must purchase separately.
Upgrade and Replacement Options
Consider whether standard components can be replaced or upgraded later. Accessible mounting points and common connectors can make future maintenance easier. Think about potential changes to the display, controls, speakers, or computer before committing to a particular cabinet design.
Warranty and Customer Support
For commercial kits, review warranty and support information before purchase. Check what happens if a part arrives damaged or a supplied component fails. Keep the documentation supplied with the kit so you can refer to it during assembly or troubleshooting.
Tips for Getting the Most From Your Arcade Cabinet Kit
Keep the Controls Clean
Buttons and joysticks receive frequent physical contact. Keep the control panel clean and follow the manufacturer’s care recommendations. Avoid unnecessary moisture around electronic components.
Organize and Protect the Cables
Good cable management makes troubleshooting and upgrades easier. Route wires neatly and prevent them from being pinched by cabinet panels. Adafruit’s cabinet documentation emphasizes checking and organizing wiring during assembly.
Maintain the Display and Hardware
Keep the screen, electronics, speakers, and ventilation areas free from excessive dust. Inspect connections if the cabinet is moved or modified. For Raspberry Pi systems, follow the manufacturer’s operating and power recommendations.
Customize Your Cabinet
Once the basic machine works, you can personalize its appearance with artwork, marquee designs, buttons, joystick styles, lighting, or compatible speakers. Make sure replacement components fit the cabinet before purchasing them.
Upgrade Components When Needed
Depending on the design, you might replace worn controls, improve audio, change the display, or upgrade the computer. Check dimensions, connectors, power requirements, and software compatibility before installing a new component.
Common Mistakes to Avoid With an Arcade Cabinet Kit
Choosing the Wrong Cabinet Size
Always measure the installation area first. Also consider the space required for players to stand or sit comfortably. A cabinet should also leave enough player space.
Ignoring Hardware Compatibility
Do not assume that every monitor, joystick, button, computer, or controller board works with every cabinet. Check connectors, mounting dimensions, power requirements, and software support before ordering parts.
Rushing the Assembly Process
Moving too quickly can lead to misaligned panels, damaged materials, incorrect wiring, or difficult repairs. Test important components before permanently closing the cabinet. Adafruit’s assembly documentation recommends dry runs and careful checking during the build.
Overlooking Ventilation and Cable Management
Keep ventilation areas clear and avoid trapping electronics in unsuitable spaces. Raspberry Pi safety guidance recommends operating the computer at appropriate temperatures and away from heat sources. Neat cable routing also makes future maintenance easier.
Is an Arcade Cabinet Kit Worth It?
Who Should Consider One?
An it can be suitable for people who want a dedicated home arcade while still having control over the building process. It can appeal to retro-gaming fans, DIY hobbyists, makers, and anyone interested in creating a customized gaming station.
When a DIY Kit Makes Sense
A DIY kit can make sense when you want more flexibility than a ready-made arcade machine provides. You can potentially select the computer, display, controls, speakers, artwork, and software configuration. The main trade-off is the extra time and technical work required to assemble and configure the system.
Conclusion
An Arcade Cabinet Kit is a practical way to create a classic gaming setup at home without building every component from scratch. With features such as cabinet panels, control options, display compatibility, and customizable designs, these kits can suit beginners, hobbyists, and experienced arcade enthusiasts.
Before choosing a kit, consider the cabinet size, build quality, control layout, screen compatibility, included components, and your available space. Taking time to compare these factors can help you create a comfortable and enjoyable arcade experience.
FAQs
1. What is an Arcade Cabinet Kit?
An It includes the main parts needed to build a home arcade machine.
It can provide a convenient starting point for a customized gaming setup.
2. Who can use an Arcade Cabinet Kit?
It’s are suitable for gaming enthusiasts, hobbyists, and DIY beginners.
The right kit depends on your experience, available space, and preferred games.
3. What should I consider before buying an Arcade Cabinet Kit?
Consider the cabinet size, materials, control layout, screen compatibility, and included components. Checking these details helps ensure the kit matches your setup and gaming needs.
4. Is an Arcade Cabinet Kit easy to assemble?
Many kits are designed with pre-cut or prepared components to simplify assembly.
However, the difficulty can vary depending on the design and your DIY experience.
5. Can I customize an Arcade Cabinet Kit?
Yes, many kits allow customization of artwork, controls, lighting, and other design elements. Customization lets you create an arcade cabinet that matches your personal style.